




Inadequate vertical room for a full-arch prosthesis can constrain component selection, material thickness, implant position, hygiene contours, and occlusion. Identifying that constraint before surgery gives the restorative team more defensible options and reduces the risk of a late-stage redesign.
See AvaDent's full-arch solutions and planning resources.
A limited interarch space full arch prosthesis is a major clinical problem that often dictates the choice of material and implant placement strategy. When vertical space is restricted, standard acrylic and metal hybrid designs may lack the bulk needed for strength, leading to structural failures or hygiene issues. To manage this, clinicians must perform a precise digital scan to determine if bone removal is necessary or if high-strength monolithic materials can suffice. According to research, insufficient interocclusal space can result in structural failure of the prosthesis and compromise oral hygiene maintenance. Modern digital workflows help laboratories assess whether a durable, cleansable restoration can fit within the available envelope. Computer Aided Engineering supports a coordinated restorative and surgical plan when anatomical room is scarce.
Managing the constraint requires balancing material strength, prosthetic geometry, component dimensions, hygiene access, esthetics, and the patient's functional load. Clear measurements and early collaboration help prevent avoidable remakes.
Limited Interarch Space Full Arch Prosthesis: Why limited interarch space changes the full-arch plan
Defining the restorative space
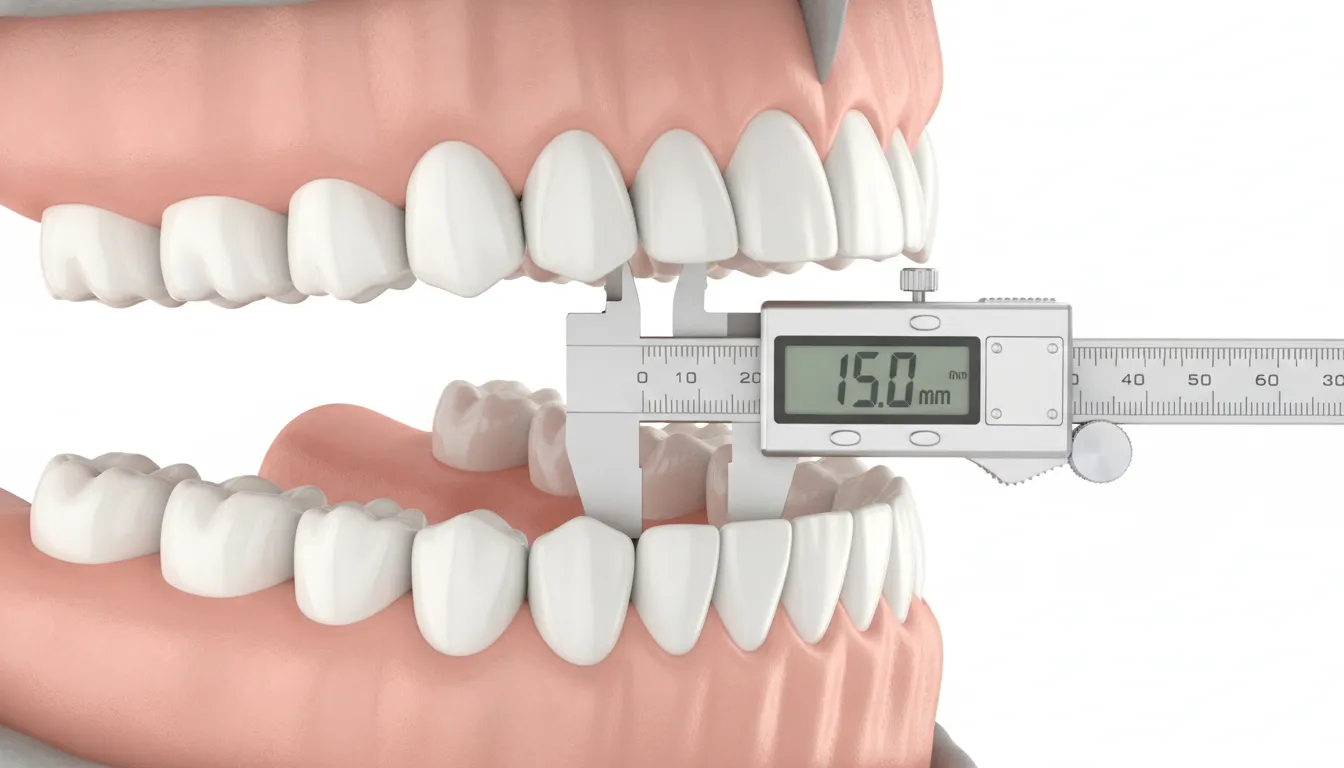
Interarch space is the vertical gap between the upper and lower jaws. In dental work, this area is often called restorative space. It is the room ready for the teeth, the base, and the parts that hold them. Having enough room is a key factor for a limited interarch space full arch prosthesis. For toothless patients, accurate measurement of this space is the first step in care. Without enough room, the choices for a full arch prosthesis are very few.
Doctors must look at this space before they place any implants. If they do not, the final teeth may not fit or look right. The amount of space can change based on how the bone has healed or how old teeth wore down. In many cases, the goal is to find the best mix of fit and function. This helps make sure the patient is happy with the final result. Medical reports show that interocclusal space limits are a major hurdle in full-mouth care. Knowing these limits early helps doctors pick the right path for the patient.
Structural and hygiene impacts
When there is a lack of space, the plan must shift to keep the parts strong. Small amounts of space mean the prosthetic parts will be thin. This can lead to cracks or a total break in the device over time. In the past, doctors used metal to add strength to thin areas. Now, they can use new materials like high-density PMMA for limited space. These materials are strong but do not need as much room as old resins. This allows for a slim design that still holds up to daily use.
Hygiene is another big worry when space is tight. Patients must be able to clean under and around the prosthesis. If the part is too bulky to be strong, it may block a brush or floss. This can cause gum disease or even implant loss. Studies show that insufficient space can hurt the long-term health of the mouth. A good plan will leave enough room for tools to reach all areas. This keeps the mouth clean and the implants stable for many years. It is a delicate balance between making the part strong and keeping it small enough to clean.
A framework for clinical decisions
Clinicians need a reproducible framework for managing constrained restorative envelopes. Digital tools help them see the space in three dimensions. Virtual surgical planning lets them test different implant spots on a screen first. This supports implant positioning that is prosthetically driven and compatible with the definitive restoration. Digital steps make it easier to see if bone needs to be removed to create more room. That determination can materially alter the surgical plan. Using these tools reduces avoidable intraoperative and restorative surprises.
The choice of material is also a vital part of the plan. Monolithic zirconia or metal-supported resins are common choices for tight cases. These options balance a reduced restorative profile with the required structural performance. Digital milling supports precise adaptation when the records, design, and manufacturing workflow are properly controlled. A validated digital workflow can reduce adjustment burden and chair time. A coordinated digital workflow can improve predictability in complex cases. The workflow provides a disciplined way to manage limited restorative space.
Diagnostic checklist before choosing a design
Clinicians must perform a full space analysis before picking a full-arch prosthesis. The limitation of interarch space is a big challenge that can lead to breakage if ignored. A precise check helps you find the right balance between strength and patient comfort.
Assessing the vertical dimension
Start by measuring the vertical dimension of occlusion (VDO). You need to find how much room is available between the soft tissue or bone and the teeth. Precise measurement of interarch space is vital to decide if a design can work. If space is tight, you may need to use thin yet strong parts like high-density PMMA for limited space.
Digital scans and 3D tools help find the best smile line and tooth path. These tools let you see how much space remains after placing the teeth in their best spots. Without enough room, the part may be too thin and prone to breaking. You must also check the ridge shape to ensure there is enough bulk for the frame.
Checking implant position and access
The spot and angle of the implants play a big role in how you use the room. Badly placed implants can force you to make a thicker part. This makes the issue of managing limited interarch space worse. Use virtual surgical planning to find these limits before any surgery starts. This step prevents many common problems that occur during the final fit.
You must also plan for easy cleaning. Tight space often leads to designs that are hard for the patient to brush. This can cause gum issues or implant loss over time. A good pre-prosthetic analysis ensures the patient can reach all areas for daily care. This keeps the long-term health of the implants safe.
Step-by-step diagnostic sequence
- Review initial records like 3D scans, photos, and current VDO to set a starting point for the case.
- Map the smile line and tooth path to find the best spot for the edges and gum tissue.
- Measure the gap from the bone or soft tissue to the teeth at the planned spots.
- Use modified surgical guides to place implants in spots that save as much room as possible.
- Check the other teeth for wear or drift that might limit the room for the new part.
- Set up a clear lab plan to share all space facts and design goals with the team.
Good lab talk is the final key. Share your digital files and space notes to ensure the lab can build the prosthetic options for limited vertical space you need. This work reduces the risk of extra steps and leads to a better result for your patient.
Fixed or removable: which option fits limited space?
Handling a limited interarch space full arch prosthesis is a major test for any dental team. When a patient has little room between their jaws, picking the right design is key. A limited interocclusal space can lead to many problems if not handled well. Materials might break or the patient may find it hard to keep the area clean. Clinicians must choose between fixed and removable options based on the open room and the needs of the patient.
Space needs for fixed designs
Fixed restorations often need at least 12 to 15 mm of space to work well. This room is needed for the implants, the metal frame, and the teeth. If the space is too small, the material may be too thin and weak. Monolithic zirconia or metal-ceramic designs are common paths for these cases. Using high-density PMMA for limited space can help solve some of these issues. This material is strong but does not need as much bulk as older options.
The AvaMax titanium frame is another great tool for tight spots. It bonds well with high-strength resins to create a thin but tough result. This allows for a fixed feel even when bone loss is a factor. Clinicians can often avoid heavy bone removal by using these newer materials. This keeps the surgery simple and helps the patient heal faster. It also ensures the teeth stay in place for a long time.
When to choose removable overdentures
When a fixed design cannot provide adequate material thickness, hygiene access, or lip support within the available space, a removable alternative may be the more maintainable option. Review AvaDent's overdenture solutions while comparing attachment height, restorative volume, patient dexterity, and maintenance needs.
Removable options often work better when space is very tight. An overdenture can fit in as little as 8 to 10 mm of space in some cases. These designs are also helpful if the patient needs extra support for their lips or face. AvaDent overdentures give patients a stable fit with a base that is easy to remove. This makes it much simpler for them to brush and floss around their implants.
Hygiene access is a big factor when space is low. If a fixed bridge is too close to the gums, it can trap food and germs. This may lead to gum disease or implant failure over time. A removable overdenture lets the patient clean the site fully every day. It also allows the dentist to check the health of the implants more easily during visits. For many older patients, this ease of care is a top priority.
The role of digital planning
Digital tools are needed for finding the right way to manage vertical space. You can use 3D scans to see exactly how much room you have before you start. This data helps you pick the best design for each unique mouth. Virtual planning can also help you make modified surgical guides to place implants in the best spots. This work lowers the risk of mistakes during the final fit.
Using AI software allows labs to map out the bite and tooth place with great care. This means fewer changes are needed once the teeth are in the patient's mouth. It also helps the lab build a frame that fits the tight space perfectly. By using these tools, you can give your patients a result that looks good and lasts long. It turns a complex case into a smooth and steady process.
| Feature | Fixed Prosthesis | Removable Overdenture |
|---|---|---|
| Space Needed | 12-15 mm or more | 8-12 mm often works |
| Oral Hygiene | Needs more skill to clean | Very easy for patient |
| Stability | Feels like real teeth | Good with attachments |
| Maintenance | May need pro care to fix | Simple lab reline or fix |
| Soft Tissue Support | Limited without bulk | Excellent for lip support |
| Clinical Case Type | Best for high-bone volume | Great for high-bone loss |
How material selection affects the restorative envelope
The restorative envelope is the total space left for a new set of teeth. When you work with a limited interarch space full arch prosthesis, every small unit of measure counts. You must choose a material that is thin but can still handle the force of a bite. This choice helps stop the device from breaking or looking too bulky. Finding the right balance lets the patient eat and speak well. It also protects the implants from too much stress.
A constrained vertical envelope requires careful control of the complete component stack. This stack includes the implants, the parts that join them, and the final teeth. If the materials are too thick, the teeth may sit too high. This can lead to a bad bite or a face that looks too long. Proper planning starts with a clear view of how much room is left in the mouth. Laboratories use digital records to quantify available space before definitive design.
Space for monolithic materials
High-density PMMA is a top choice for tight spaces. AvaDent uses a special material that is eight times stronger than standard options. This extra strength lets labs mill a thinner base while keeping it very tough. Using high-density PMMA for limited space leaves more room for the rest of the build. These materials also stay clean because they resist stains and tiny germs. This helps keep the gums healthy over time.
These solid materials are milled from a single block. This process removes the weak spots found in old hand-made dentures. In a small space, a single solid piece is less likely to snap. It also allows for a more natural feel for the patient. Since the material is so dense, it does not soak up water or bad smells like older plastics did. This makes the device more pleasant to wear every day.
Strength with metal support
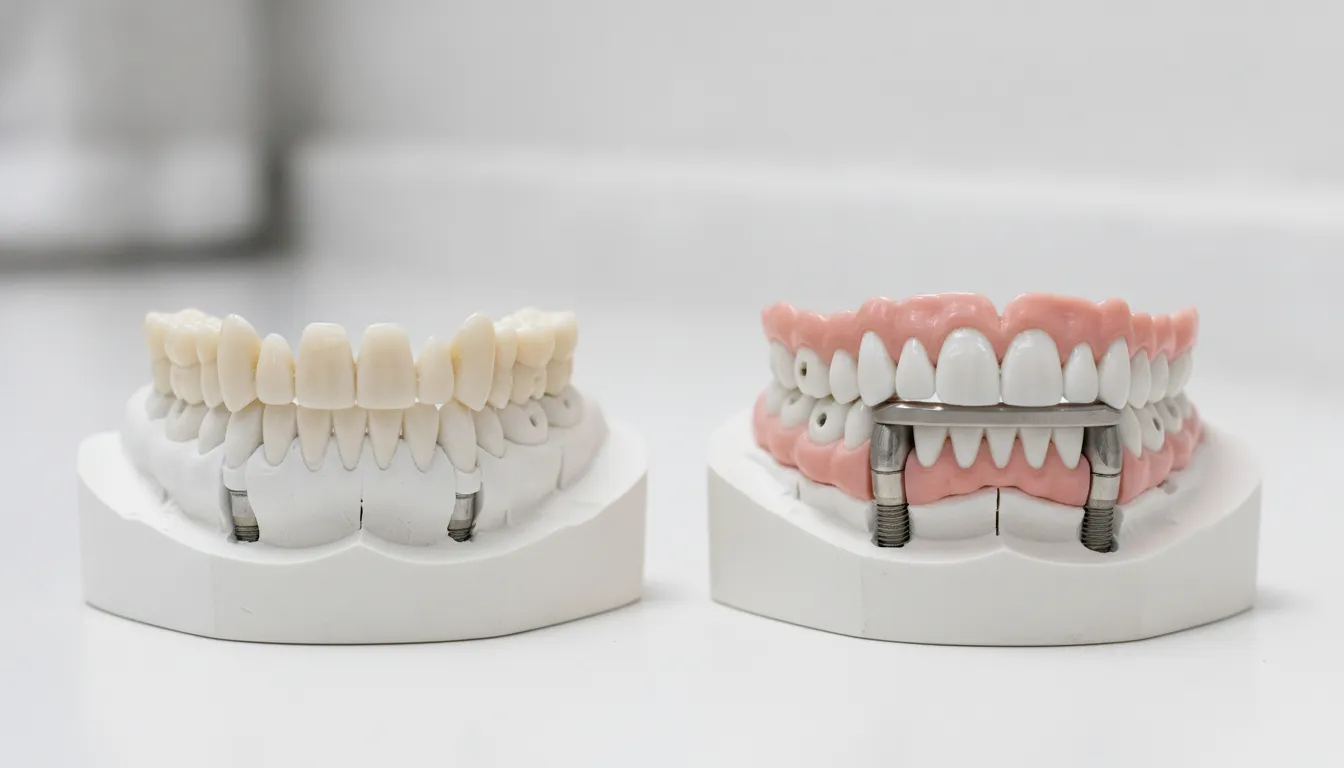
A titanium-reinforced design can provide a different strength and space profile than a conventional acrylic hybrid. For cases requiring a precisely engineered titanium and high-density PMMA solution, review the AvaMax full-arch prosthetic line and confirm case-specific dimensions with the laboratory.
A thin metal frame can help when vertical space is very low. The AvaMax system uses a titanium bar to support the prosthetic teeth. This metal bar adds stiffness without adding much height. It spreads the force of the bite across all the implants in the jaw. This helps the device last for many years under heavy use. It also makes it easier for a lab to fix the device if needed later on. Titanium is very light but holds its shape well under pressure.
Using a metal core allows for a "low profile" design. This design is vital for patients who have lost some bone but not a lot. In these cases, there is not much room for thick layers of pink plastic. The titanium bar gives the teeth a firm base while keeping the device slim. This makes it easier for the patient to keep the area under the bridge clean. It also feels less bulky against the tongue.
Choosing between zirconia and hybrids
Zirconia is very strong but it needs more space than some people think. It is heavy and can crack if the walls are too thin. Hybrid options like PMMA on a metal bar are lighter and often fit better in small gaps. They are also softer on the teeth in the other jaw. This helps stop wear and tear on the natural teeth. A hybrid device is also easier to change if the patient's bite shifts over time.
Modern labs use digital tools to check these materials before they are made. High-tech scans show the exact space left in the jaw. Software can then find the best spot for the implants and the frame. This removes the guesswork from the process. It leads to a better fit and a device that lasts much longer. Clinicians can see the final result on a screen before the first cut is made.
Design strategies when space is limited
Dealing with a limited interarch space full arch prosthesis is a tough task. It often makes full-arch implant work harder for the dentist and the patient. When space is tight, the risk of the prosthetic breaking goes up. It can also make it hard for the patient to keep the area clean.
Research shows that limited interocclusal space is a major hurdle in full-arch rehab. To fix this, doctors must use a plan that looks at both surgery and design. This starts with a clear check of how much room is left before any surgery starts. If you ignore this step, you may face big problems later.
Exact space check
You must know the room you have to work with. If you do not measure well, the final set of teeth may be too thin and weak. You can use 360-degree scans of old dentures and special software to measure interarch space in patients with no teeth. This data tells you if the case can work with current bone levels.
AvaDent uses smart software to help find the best spot for the teeth. This digital plan lets you see the space from every angle. It helps you pick the right prosthetic options for limited vertical space. By planning first, you avoid shocks during the final fit. Digital files also make it easy to change the design if needed.
Restorative-space assessment must account for more than tooth height. You need room for the framework, the acrylic, and the parts that hold the implants. Each part takes up space. If you miss even a few millimeters, the whole design can fail.
Surgical and bone planning
Sometimes, you need to change the bone to make more room. This process is called alveoloplasty. It creates a flat base and enough space for the implants and the teeth. Precise surgical planning helps you know how much bone to remove. You want to take away just enough to fit the teeth, but not so much that you hurt the patient.
Special surgical guides can help you place implants in the best spot when room is low. These tools guide the drill and the implant. They make sure you use every bit of space you have. This leads to better outcomes and less stress for the clinical team. Guides also help avoid vital areas like nerves or sinus holes.
Bone cut should be done based on the final tooth spot. This "teeth-first" way of thinking is key. It ensures the gum line stays hidden. This keeps the smile looking natural and nice.
High-strength materials
When vertical space is limited, materials and components must meet structural requirements at the proposed dimensions. Old acrylic might crack if it is not thick enough. This is where monolithic zirconia or titanium frameworks come into play. These parts balance strength with a small size. They allow you to build a tough set of teeth in a tight spot.
- AvaMax titanium system adds high strength to full-arch cases.
- XCL materials are eight times stronger than old-style PMMA.
- Digital milling creates a better fit than manual lab work.
- Adaptive occlusion software helps balance the bite for long life.
Using high-density PMMA for limited space helps keep the teeth from breaking. These thin but tough parts allow for better hygiene paths. They also ensure the patient can speak and eat with ease. By choosing the right material, you give your patient a smile that lasts.
How should clinicians and laboratories validate the plan?
Doctors and dental labs must work together to check a treatment plan before they make the final device. This check is key when you work with a limited interarch space full arch prosthesis. If the space is tight, even a small error can cause the device to break or fail. Checking the plan helps to make sure the fit, look, and bite are all correct before you finish the case. By checking early, the team can avoid high costs and lost time later on.
Share full clinical data
The first step is for the doctor to send clear records to the lab. You need to send high-quality mouth scans and face photos. You must also include the exact bite records and the height of the bite. These tools help the lab see how the jaw moves and how much room is left for the teeth. Precise measurement of the space between the jaws is needed to see if the plan will work for a patient who has no teeth. You can find out if a design is a good choice by using a 360-degree scan of an old denture.
Labs use this data to see how much room is left for the metal or plastic. If there is not enough room, the lab might suggest a change to the implant spots. They might also ask for a new surgical plan to make more room. This early talk helps both sides avoid big problems later in the process. It also makes the final result more sure for the person getting the new teeth. Good data is the base of a strong and lasting smile.
Review the digital design
Once the lab has the data, they create a digital version of the teeth. Modern software lets the lab check the space from every angle. This digital check is a key way to stop problems before surgery or building. It helps the team see if there is enough space for the bar and the teeth. It also helps to check if the person will be able to clean the new device easily at home. If the space is too small, the lab can alert the doctor right away.
During this stage, the doctor should look at the digital files on a screen. You should check where the teeth sit and how they meet when the patient bites. You also need to look at how the device sits against the gums. This review is a good time to think about managing limited interarch space with a stronger material. If you find a flaw now, you can fix it with a few clicks. Digital tools make it easy to try different ideas before you cut any material.
Use a try-in or prototype
A physical prototype can provide valuable validation of the proposed design. Labs can print or mill a test piece from a cheap plastic first. This try-in allows the clinician to assess fit, esthetics, phonetics, and occlusion intraorally. You can check how the patient talks and how they bite down on the teeth. It is much easier to change a plastic test piece than a final metal or ceramic one. This step helps the patient see how their new teeth will feel and look.
For cases with very little room, you might use high-density PMMA as a test. This material is strong and lets you see the final shape of the work. After clinician and patient approval, the laboratory can proceed to definitive fabrication. This signoff means the lab can move on to making the final piece with no worries. This staged process supports a more predictable definitive restoration. It gives both the doctor and the patient peace of mind.
Common planning mistakes to avoid
Planning a limited interarch space full arch prosthesis requires more than a single check. Doctors often make the error of treating vertical space as the only factor. But the vertical gap is not just one number on a scan. It is a complex zone that must hold the teeth, the frame, and the dental implants.
Stopping the part stack trap
A common mistake is failing to plan for the full stack of parts. Each part of the tool takes up room. This includes the height of the metal base and the teeth. If you do not plan for every small bit of space, the final teeth may be too thin and break under biting forces.
A study in the Journal of Prosthodontics shows that checking old dentures can help find these limits. You need this data to see if a plan can be done. Without it, you might pick a material before you know the space you have. This often leads to a break.
Using high-strength materials like XCL can help when space is tight. These materials are up to eight times stronger than old PMMA. This added strength allows for thinner designs that still last.
Bone cutting and hygiene access
Many dentists think that cutting bone is always the answer for low space. Removing bone can create room, but it also changes the patient's face. It can make the smile look less real. A better path is to use digital planning before any work.
This allows you to find the best implant spot without cutting too much bone. It also helps you avoid these common issues:
- Blocked access for daily cleaning
- Poor lip support or facial sag
- Increased risk of implant failure
Ignoring hygiene is another frequent error. A clinical report on interocclusal space notes that poor planning can block access for cleaning. If the patient cannot clean around the implants, the work will likely fail, so you must leave enough of a gap for brushes and floss. This is part of finding prosthetic options for limited vertical space that last.
Precise lab records and material choice
Poor lab records can stop a project before it starts. The lab needs a clear map of the gums and the jaw fit. Without good data, the lab cannot design a strong frame. This is why AvaDent uses AI software to make each plan better.
You should not pick a material until you know the space. Such as, some people want zirconia, but it needs a lot of height to stay strong. If space is low, a titanium frame with high-density PMMA might be better because this mix provides strength without being too thick. You can find more details in our high-density PMMA for limited space guide.
Review AvaDent clinical studies before finalizing your full-arch material and workflow decisions.
Frequently Asked Questions
What is the minimum interarch space required for a full-arch fixed prosthesis?
Fixed full-arch dental implants usually need 12 to 15 millimeters of vertical space for each arch. This measure includes the height of the abutment, the frame, and the prosthetic teeth. If you have less space, the parts may be too thin and could break. According to clinical research, limited space is a top challenge during the prosthetic phase. Precise planning is vital to make sure the teeth last a long time.
What corrective options exist for patients with inadequate interocclusal space?
If a patient lacks enough space, doctors can use several clinical steps. Bone reduction is a common way to gain vertical height before placing implants. Another choice involves using strong parts like monolithic zirconia. These parts can be milled thinner than acrylic and still handle bite forces. Using modified surgical guides can also help place implants at the best depth for the final design. These tools help improve the final clinical result.
Why is interarch space assessment critical for full-arch implant success?
Proper space checks help prevent failure and keep the mouth healthy. Not enough space often leads to parts that are too thin to resist biting forces. It can also make it hard for patients to clean under the bridge. Poor hygiene access often causes gum disease and implant loss. As noted in clinical studies, using digital scans of old dentures can help measure this space accurately. Doctors should check space early in the care plan.
How does muscular strength influence interarch space requirements?
Patients with strong bite forces, like those who grind their teeth, need thicker prosthetic parts. These patients often need strong frames to prevent breaks or chips. When space is limited, high bite forces put extra stress on thin parts of the bridge. Doctors must balance the need for strength with the available vertical gap. Digital tools and strong materials from AvaDent help manage these heavy loads. Choosing the right material is key to a good result.
Ready to talk with AvaDent about full-arch prosthetic planning?
Ignoring space limits in your dental cases can lead to weak spots or failed parts. If you wait to plan, you risk late changes that add time and cost to your work. By starting your project now, you can lock in a strong design that fits the first time. This means fewer visits for your patient and a better result for your dental lab. Getting ahead of these design issues today will save you hours of rework and stress later on. You can learn more about our work by viewing our full-arch implant guide for clinical cases. When you act fast, you get a clear path to success that keeps your chair time low and your patients happy. Do not let small errors slow down your clinic or hurt your name for good work.
Ready to start? Call 480-275-2736 to talk with AvaDent about full-arch prosthetic planning.